Today I'm thrilled to say we have a guest post from the lovely Cassie Stephens, my first ever guest blogger! If you don't already own one of her beautiful belts you really should - I own three of them and adore them all! She has a wonderful blog full of gorgeous pictures and beautiful creative ideas, so I'm very happy to have her here today. Take it away Cassie!
 |
| Okay, if you couldn’t tell already, I’m a bit of an extremist. I mean, if you’re gonna go floral, you might as well paint ‘em on your walls, stick ‘em in your hair and embroider them onto your dress, right? |
Greetings from Nashville, Tennesse! I’m so excited to be a guest on The Little Red Squirrel and chatting with all of Katie’s lovely readers today.
My name is Cassie and I am an elementary art teacher, crafter and lover of all things vintage-y. I have been so inspired by the idea behind Katie’s blog of either creating one’s own clothing or buying vintage. It’s such a thrill to see her latest knitted garment or handmade dress. She doesn’t know this, but her adorable circle skirt with the embroidered vintage gals was the reason I picked up my embroidery hoop, needle and thread again. So I thought it appropriate to share with you my latest embroidered venture!
 |
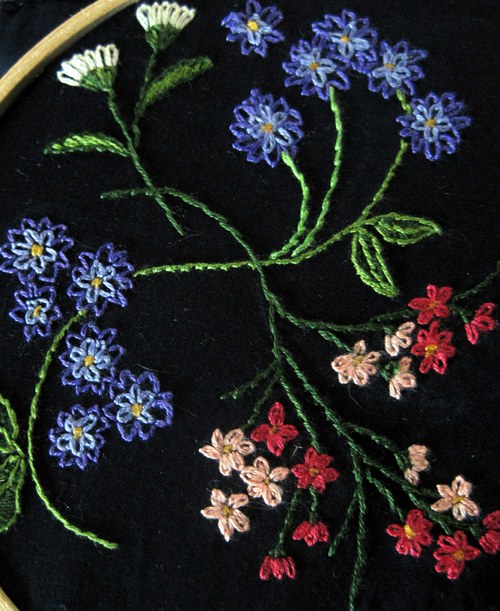
| Just a little close-up. I’ve had this very comfortable yet pretty boring dress in my closet for years. It seemed like the perfect blank canvas for some embellishment. |
Embroidery has a special place in my crafty heart. During my summers, I often stayed with my very artistic grandmother. We would spend time on her porch with hoops on our laps and glasses of iced tea at our feet. I loved the idea of creating a picture with a needle and thread. Her favorite motifs were Native Americans while I favored teddy bears and balloons. I’ve since moved on to rainbows and unicorns. I’ve grown up a lot since then.
 |
| Please pardon the cat hair. I have an oversized kitty that sees my arm as her permanent resting place which makes embroidery, brushing one’s teeth, eating and typing extremely difficult. |
Interested in adding a little embroidery pizzazz to your look? It’s so easy and fun. All you need are the following:
Cotton dress (this dress is both cotton and jersey knit. I embroidered on the cotton only)
Embroidery floss
Adjustable hoop
Embroidery needles
White pencil
Embroidery floss
Adjustable hoop
Embroidery needles
White pencil
Now, before I explain this, let me just say that yes, I am a teacher, so I can kinda-sorta explain things in an semi-coherent manner. However, I’m a little scattered and my embroidery methods are not traditional. So, if you’re cool with that, here you go:
1. If you are working with dark fabric, you can trace your design. I had an idea in mind, so I drew directly onto the fabric with a white pencil.
2. Always keep your fabric stretched taunt to insure a flat finish. No one likes weird bulges.
3. Cut your embroidery thread to a 9” length and separate into two threads from the six.
4. Tie a knot to the end of the thread and begin to trace over your pencil lines with the thread.

It really is that easy! I tried my hand at some floral stitches for this particular project. There are countless places on the internet that can easily walk you through these types of stitches. My favorite part is coming up with my own design and creating something that is truly unique.

I do hope you’ve enjoyed this little DIY as much as I have sharing it with you. Thank you, Katie, for the chance to have a chat with your sweet readers. If ya’ll would like, feel free to drop by my little blog at cassiestephens.blogspot.com. Thanks for reading!
14 comments:
Hello Cassie! I love your post! I am embroidering bees at the moment and loving it, though a perfectionist I keep having to re-do wee bits here and there! Will I ever be done with it! haha! Have a great week! :) x
Hi Zoe! Thank you for the compliment...and as for being a perfectionist, I understand. But mine got to the point where I just wanted it FINISHED...so I was able to look past the imperfections ;) I'm off to check out your blog! ... cassie
Cassie your embroidery here is beautiful! I have a friend who has embroidered birds on her cardigans that I love too, and see your master piece makes me want to give it a try!
Absolutely love your floral background!
LOVE this!! I am just about to move away from cross-stitch and fiddle about with embroidery - so this is exactly what I needed.
Oh my! This is just absolutely beauuuuuutiful! The choice of colours and tiny design against the black dress works so well. I've only embroidered woodland creatures, kitties and fruit onto napkins so far... I feel so inspired to embroider clothing right now - thank you!
Gosh this is so pretty, it honestly could not suit your dress more! Its wonderful!!
Great guest post! I love embroidery, but I too am kind of free-spirited about it. I mostly use a stitch that I didn't know had a name (and it's been so long now I can't remember what it is, either lol). I'd like to learn more and do more embroidery, this is inspiring me to pick up a couple of my abandoned projects. :)
Oh, Tasha, your knitting skillz run circles around my embroidery ones! I swear, I'm always saying, "gah, how does she do that?!" when I visit blogs like yours and Katies...knitting is just beyond me! Until I grasp it, embroidery it is! ...cassie
Thank you, Wendy! It was time consuming...but I'm pretty excited about the result ;) ...cassie
Ohhhh, woodland creatures and kitties!? I most certainly know what I'll be working on next! Thank you for the compliment, Tilly! I absolutely love your blog...thanks for your kind words :) ....Cassie
And I've been dying to get back into some cross-stitch. I have a rather blah gingham dress and i think those little gingham squares would look adorable with a cross-stitched design inside. (mental wheels turning) So glad you mentioned it! ...Cassie
Bri -- thank you for your kind words! The background is an unfinished painting that I began an embarrassing number of years ago. Oh well, one of these days, I guess ;) ...cassie
This is a great tutorial! It shows how easy embroidery is. I always thought it would be too difficult for me to get a hand in. Thanks so much!
My favourite is the white daisies with pink tips! It looks like you have made lazy daises but anchored them with a different colour of thread? (embroidery newbie here). This whole thing is sooo sweet. I've been dreaming of embroidering on clothing for a while, but I've never come up with a good way to incorporate it. I'm bookmarking this for inspiration :)
Post a Comment