Sunday, 30 January 2011

Dreaming of Dreamy Coats

Hi everyone! No joy on the swing dress for me today, the process of sewing the bodice is still evading me, so I decided to take things easy today and just catch up on some knitting (I'm working on Enchanting in Black and White and it's going very well, pictures to follow as soon as it's finished!) and watch some Hustle.

For those of you who don't know, Hustle is a BBC program about a group of con artists based in London, and it's great fun, although a little far fetched as they get away with it every episode,  no matter how well prepared the other party seems to be! Anyway, the reason I am bringing up Hustle is that today when watching it I spotted what could be the coat of my dreams and I just had to share it with you!
I've seen Jaime Murray (who plays Stacey) wear this coat in a number of episodes and the more I see it the more it makes me happy. It is a beautiful cut for one thing, fitting closely on the bodice and being nipped in at the waist before flaring out into the full skirt. And although the picture doesn't show this very well the back of the coat is slightly longer than the front giving the coat a really dramatic look. And don't even get my started on the embroidered flowers! And the cord detail on the waist band! This coat is just painfully pretty, it makes my heart ache! I wasn't able to find any good pictures of the back of the coat for you but it looks very similar to this pattern:
Vogue 8626
It has the same pleat in the back as the picture above, only of course the coat of dreams is to the floor. Now I mentioned in a previous post that I wanted to add an evening coat to my wardrobe this year. Now I was leaning towards a more vintage look, a double breasted navy coat with a large fur collar, something like this:
Vogue 8346
But now I'm not sure. If I could have a shot at creating the Hustle coat I would be a very happy bunny indeed, and I would love brushing up my embroidery skills with all those beautiful flowers. Plus, Rachel has just added and amazing surface cording tutorial to the Colette website, which would be perfect for the waist band! 

I just can't choose, what do you think readers? I love to hear your opinions :) I'll leave you with some more detailed pictures of the Hustle coat, it's just too pretty not to!!


Happy weekend everyone :)

Saturday, 29 January 2011

Swinging and sewing along... and STUMPED

Now let me start off by saying that this is not at all me finding fault with Casey's swing dress sew-along. As everyone knows Casey is a genius and her sew-along has been brilliant, organized and clear. This is what happens when I try to do things on my own


Muslin pieces, cut out and ready!

At first everything was going swimmingly. I had chosen my fabric, finished the mammoth job of sticking together all of the pieces of the downloaded pattern, I'd altered the length of the hem, the sleeves and the bodice on the pattern, and then cut out each of my new pattern pieces ready to work. I then spent most of today cutting out my fabric for my muslin and marking up each piece with all the necessary lines and notches etc. Now I was feeling pretty smug at the amount that I had gotten done, so I was feeling a little bit daring when I saw these words at the end of Casey's last post:
"If you are feeling confident, start sewing it up if you have time over the next few days."
And being all cock-sure and devil-may-care that's exactly what I decided to do. I can now say that this was definitely not the best plan of action. The first two sewing instructions were simple, sewing up the dart on the centre back and then attaching the back facing, no problem. It's when I got to step 3 that my problems started. Now I would just like to say that all though I wouldn't say I was a pro sewer by any stretch of the imagination, I am not a novice and I have used patterns a great deal more complicated than this one before, so I was really not expecting to have any difficulties. Maybe it was because it was getting late or maybe I'd had a small stroke or something, but I really couldn't make head nor tail of the next step.

Excuse me...what??
The instruction is to match the bodice front up to the back facing you have just sewn, right sides together, and stitch with a 5/8" seam and this seam will end at the dot where you stopped sewing on the back facing seam. Well my seam didn't stop there, it was about an inch away from said dot. And I also couldn't get my real life pieces of fabric to resemble the little line drawing given to illustrate the step. I tried to sew this seam 4 times, each time ripping it out again because when turning the facing in the front piece would be facing the wrong way or inside out. I felt like I must have been over complicating this process immensely. Surely just sewing two facings together shouldn't be this difficult? So I decided to glance at the next step to see whether or not it could give me a clearer explanation of what I was doing wrong.

Right, ok then..?

And at this point I just sort of gave up. I looked at the picture above, which is supposed to be showing me how to complete the step, and I thought "well I can't even tell what that is, so how am I supposed to recreate it?" So I spent a great deal of time staring at this image and trying to understand it, but the more I looked the more it reminded me of Egyptian hieroglyphics. And when I started to feel the picture was taunting me I knew it was time to stop for the day! 

I did make a start on this step, I gathered my bodice front between the notches as required, but then I was faced with a paragraph of wordy instruction and my mind just switched off. I have never been someone who learns easily just from reading words, my mind is much more stimulated by pictures and shapes, so I suppose that is why I'm struggling to find my way through these instructions. I'm sure I'm just making a mountain out of a mole hill and as soon as I read Casey's next post I will be back on track again and laughing at my silliness and my inability to understand something ridiculously simple, but right now I just feel tired and a little grumpy!


I'm sure many of you have had moments when you feel like your sewing ability has gone, never to return, well my over-dramatic sensibilities are pushing me in that direction right now! However, I'm sure everything will look better in the morning, so I'll come back to this dress tomorrow after a good night's sleep. Who knows, I might even get an epiphany in a dream and suddenly realise what I was doing wrong...


Can someone tell me what this is please because I just don't know!


I hope you're all having great weekends and that your sewing projects are going a little more smoothly than mine!

Friday, 28 January 2011

The First day of Temptation!

Today I was faced with the first big temptation of my make-not-buy challenge: Shopping. In London.

I went out for brunch today with my beautiful gal pal Harriet, a day of good food, great conversation and gorgeous company. And, as is tradition for such days out, we went shopping. Now, I was nervous about how I would cope back in the boutique world, my first visit after my little vow of no buying this year, particularly as we were visiting my one of my favourite retail haunts, Covent Garden. I know this area and its shops so well that I can navigate around and  find exactly what I'm after in next to no time, something that has caused me to splurge on countless previous occasions. However, today things were very different.

I'm very pleased to say my friends that I resisted temptation! I did not buy a single thing on the shopping trip (well not quite true, because I bought a book and some cupcakes, but they don't count!). And what's more, I found myself looking at the whole process of buying clothes in a completely different way. Because I knew that I wasn't supposed to be buying any clothes on this shopping trip, I found myself looking in much more detail at every item, almost daring myself to be tempted enough to break my promise. And the way I started feeling really surprised me. I'll use the following dress as an example:


Now, Harriet and I were both drawn to this lovely slip dress in Urban Outfitters, and so I made Harriet try it on - being unable to do so myself for temptation reasons. Now, this dress fitted her very nicely and it looked lovely on, but both of us felt that the price tag of nearly £50 really did the dress no favours. And on closer inspection I found more things that just didn't ring true for me. The construction of the dress is really simple, the only slightly fitted aspect being an elastic waistband, and the fabric, though appearing to be silk, is actual some kind of polyester blend. The dress is also really quite flimsy and thin so I doubt it would last long if worn on a regular basis, something that I would expect if I was paying £50 for it. After coming to all these conclusions I just wasn't interested in the dress anymore.

Now, there is nothing really wrong with this dress, it looked lovely on and is pretty, and a past version of myself would probably have bought it, but the new make-not-buy me sees every aspect of the dress, giving me a much clearer perspective on whether I actually really want it/need it or not. And if I decide that I need something similar I can bask in the smug satisfaction that I could make one myself, completely unique and probably half the price :)

So there it is, my first day of temptation, faced, overcome and finished feeling confident and excited about times ahead :) Hurrah for revamping and home crafted outfits, I think I'm officially a fully fledged convert!

P.S. The book I bought is the fabulous "Style Me Vintage" by Belinda Hay, detailing how to create a whole plethora of different vintage hairstyles. I can't wait to give some of them a go!


P.P.S. We bought our cupcakes from Hummingbird Bakery in Soho, they are like little pieces of heaven. Their red velvet cupcakes with cream cheese icing are to die for. Seriously, if you're ever in the area give them a go! 


Have a great weekend everyone :)

Thursday, 27 January 2011

To petticoat or not to petticoat


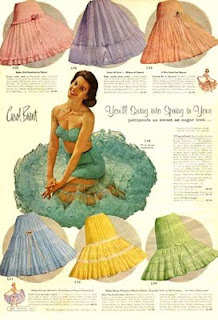
In my previous post  I mentioned wanting to make a crinoline to go under my "Vintage Re-vamp" cream floral dress. If you can remember, this dress - although it now fits me beautifully - looked rather sad on Gladys the maniquin as it's skirts hung listlessly and without life. I felt sure that a simple crinoline would do the jobs to spice up this dress, but as I looked at the dress I began to wonder whether this would be enough. Would it give the skirt enough lift and body? And then of course my mind wandered off, and I began thinking about 1950s full petticoats, like the ones pictured above. I found myself thinking more and more about these petticoats, and in particular whether or not it would be worth my while making one or not. It was clear to me that a 1950s petticoat was the way forward, having doubt in my mind that the line of the skirt can only reach it's true potential with a full swing-style petticoat underneath. However, this decision now presents me with further choices to consider: Should I try making one of these notoriously tricky undergarments myself - probably the more expensive and definitely the most complicated option - or should I simply buy one, even though this goes against my vow to not buy new clothes this year? Hmmm. I think we need to look at this in more detail.


Ok, so I don't know a single vintage girl who hasn't at some point lusted after one of these gorgeous full petticoats. Not only do they make your waist look tiny and fill out a circular skirt beautifully, they also have the power to give you instant glamour. The swish of tulle  as you walk cannot help but put a swing in your step, making you feel as girlie as it gets. I have always been a fan, and have wanted one for a long time, but have never succeeded in purchasing one. And anyway, aquiring one of these beauties in London can be a tricky business.

As these petticoats are so sought after they tend to get snapped up as soon as they appear in vintage shops, and this equally means that the originals can be horribly overpriced. Another option that is always on offer is the newly made petticoats, usually found decorating a wall in a whole rainbow of different colours. Rokit can be seen selling them here for a reasonable-ish £40 each. Now although I can see the appeal of buying one of these - instant gratification and all that - I've never been tempted enough to buy one, and believe me I have visited their shop in Covent Garden enough times! I suppose I am just loath to buy something that I feel I could quite easily make myself, and therefore personalize in any way that I might want. And so we move on to the move onto the more complicated make-one-myself option...


I have a fascination with how clothes are constructed, in particular lingerie, and so making my own petticoat would be an obvious choice for me. However, over the years I have read several horror stories about the sheer amount of work that goes into making one of these - I have visions of nights spent wrestling with never-ending yards of  tulle netting! - and as none of the blogs I follow seem to have tackled this project before it makes me wonder if there is a good reason for that. Maybe this is a project that is just too much work than it's worth. Well I thought I'd indulge myself by looking into the ins and outs of the process just in case, starting with the cost.

I have found online tutorials to make full petticoats requiring 9 to 12 yards of nylon netting, and when perusing the yardage of some vintage patterns some use up to 16 yards of netting, and on top of this you require yards and yards of satin ribbon to bind all of the raw edges. Now the cheapest I have been able to find tulle from a UK supplier online is 50p a metre, so if I was to use the largest amount of fabric plus about 50 yards of satin ribbon (this is the actual amount required on the pattern, I kid you not!) you're looking at a total cost of about £20 for raw materials, half the price of the Rokit pre-made version. Now that's not half bad considering.  And by making one would mean I would be able to have my cake and eat it: I would have a (hopefully!) beautiful new petticoat and I would still be living up to my promise to make all my own clothes this year. But would the amount of man hours needed to complete the project mean that it is just not worth it? But then again, couldn't you say that about any home crafted fashion project?

Well my friends, I am still undecided - and let's be honest I'm not going to have time to start a new project for a while, not with 3 sew-along on the go at the moment! - so although my heart is steering me very much towards the make-one-myself option I'm not going to commit myself to anything just yet. If I can find materials of decent quality and price when I have some time on my hands again this petticoat project could definitely be on the cards, but for now I'll just say that I'll keep you posted. If any important petticoat decisions are made you will be the first to know!

And what do you think about the idea anyway? Does this seem like madness to you, or am I being over-dramatic and do you think the full petticoat would make a wonderful project? Or have any of you tackled the petticoat before and can offer warm words of advice or warning? I'd love to know your thoughts on the subject! But for now, I'll leave you with some more petticoat pictures. They are lovely aren't they? :)


Wednesday, 26 January 2011

Wednesday Wonderfuls #2

Allow me to add a little sparkle to your midweek with some little pieces of wonderfulness!

  • Debi made the most beautiful 1930s dress recently, I guarantee you will be awed by its splendor :)
  • Tilly is hosting a giveaway of Fancy Moon Fabric, they have some gorgeous stuff so enter to make sure you don't miss out
  • I think that Rachel's method for continuous bias tape is quite brilliant, I shall be trying it out very soon I'm sure!
  • I started following a new blog this week, "Bobbins and Bombshells", Karen who writes it has a great sense of style, with a lovely vintage feel. Well worth a read!
  • And finally, on a lighter note, I've been searching online for some Valentines recipes, and after looking at Joy the Baker's blog I found her recipe for heart shaped dipped krispie treats. They look easy and budget friendly as well as being great fun and yummy, so you can't really go wrong :)


I'm feeling very happy at the moment for various reasons, one being that I've just started a new job at the glorious sweetshop Hope and Greenwood - surrounded by vintage sweeties all day and encouraged to dress in a retro fashion, heaven! - and another being this blog. Thank you so much to everyone who has followed me so far, I hope you're enjoying what you read and I'll endeavor to provide you with some good reading material! I'll leave you with a picture of my lovely new workplace.


I get to work here!
Happy Wednesday everyone :)

Sunday, 23 January 2011

Vintage Revamp #2 - Cream Floral Dress

Ok, I know I'm being a little premature in revamping a cotton summer dress, but this one has been a long time coming for me! I bought this dress on my first ever vintage shopping excursion, to Absolute Vintage near Brick Lane. In fact, it was my first ever vintage purchase! It was bought for a college performance, and I never intended to wear it recreationally, the hem was too long and the neckline very high for my taste, and I also wasn't a fan of the sleeves. However the longer I had the dress the more I admired the beautiful fabric and the more I dreamed of turning it into something more wearable. So, being a younger and therefore more naive and foolhardy version of myself, I took a pair of scissors to it, with rather mixed results...
Oh Gladys, you hussy!
The hem adjustments went perfectly, but as you can see from the above picture, the neckline adjustments were a little risque, even for me :) Because of this uncorrectable error the dress was banished to the bottom of my altering pile to be forgotten. But today I formulated a master plan to finally finish what I started about three years ago!

I took some cotton lace from my stash and began to stitch lengths of it together, to produce layers of scallops. I wanted to use these pieces of layered lace on the neckline of the dress and give it back some of its dignity.

You can see from the above picture that the dress looks better already! I took my seam ripper and sliced open the neckline of the bodice creating a gap between the lining and the outer shell, and I slipped the layers of lace between the two. All that was left for me to do was pin the lace in place and the hop onto my sewing machine and get stitching! And after some little finishing touches - snipping loose ends, overlocking raw edges, etc. - my sweet little dress was finished!
Finished neckline detail

Finished back


Full view of finished dress

I am sad that it will be a while before I can wear this dress, in comfort at least, because of the weather we're having. But I suppose that the upside is I will have lots of time to make some accessories to go with it. I'm dreaming of a simple crinoline (which I think will give the skirt a more pleasing shape), a bow belt and a raspberry coloured cardigan. I'd better get working!

Friday, 21 January 2011

What a difference a day makes

...On the progress of the Pendrell Blouse! Due to the terrible naughtiness I admitted to yesterday - i.e. completely ignoring the blouse in favour of the crepe dress - I decided to commit my day's sewing time to the blouse today, and I'm pleased to announce that I've caught up, so hurrah! In the end I didn't need to do any major adjustments to the pattern pieces - the most I did was remove some length from the hem line - because for once my measurements fitted into one size bracket perfectly. So I didn't need to use more than one pattern size, and because the blouse is designed to fit a C cup comfortably I didn't even need to do a bust adjustment. Well I just feel spoilt at how easy this pattern has made my life so far!

Having done the minor adjustments I needed I spent the rest of my time cutting each pattern piece out of my gorgeous pink silk-satin and that leaves me all up to date and ready to start construction next week.
All cut out and ready to go!
I also now have a nice little stash of off-cuts of the aforementioned fabric which have set the cogs whirring with ideas of pretty little pink projects. Perhaps they could be used to further my lingerie revolution, and I also quite fancy one of these pretty 1950s headbands in pink silk-satin :)
Oh the possibilities :)


I will leave you today with a few snap shots of things that have been making me happy for the past few days. I hope you all have a wonderful weekend, and check back soon for more updates!


Happy Friday everyone!


Thursday, 20 January 2011

Crepe Dress/Pendrell Blouse/Swing Dress sew-alongs - the update

Also know as "The Good, the Bad and the Not-Ugly-But-Certainly-Daunting".

Let's start off with "The Good":

The Crepe Dress
Now I'm feeling quite smug about this sew-along, because I was several steps behind, but have managed to catch up and everything seems to be going well :) Gertie provided us with a pre-sew checklist a few days ago, so I'll break down my progress for you:

  1. All bodice and skirt pieces cut out and underlined - Done, and I really enjoyed doing all the hand sewing! There was something very therapeutic about sitting with layers of fabric on my lap whilst basting them together with silk thread. I felt quite otherworldly!
  2. Pretty little basting stitches :)
  3. Necklines stabilized - Done as well, and once again much fun was had with hand basting, only this time I was attaching strips of silk organza.
  4. Facings adjusted and cut out - A nice new skill learnt!
  5. Interfacing fused to facings - Done!
  6. Pockets cut out - Done x 4!
  7. Tie cut out in contrast fabric - Done, and the fabric is really pretty and feels lovely :)
I have also sewn and pressed all the bodice darts so I am ready to start sewing in earnest, happy days!
Front bodice piece, all ready for construction
 Now, unfortunately, I must tell you about "The Bad"


The Pendrell Blouse
I suppose I'm being a tad over dramatic, "The Bad" simply is that I haven't given the Pendrell Blouse a look in yet. I haven't even started! I've been dedicating my sewing time to the Crepe Dress sew-along to catch up, and because of this I am now about 7 posts behind on the Blouse! Oh well, hopefully I will remedy this in the next few days. For now I will just give myself a rap on the wrist and move on...

... to "The Not-Ugly-But-Certainly-Daunting"

The Swing Dress
Now Casey has yet to start posting stages in her sew-along (apart from prepping and supply gathering) so I thought I'd get my pattern pieces ready to start. As I'm from the UK I decided to go for the e-pattern of the swing dress so that I could have it immediately, rather than having to wait for the paper pattern to be delivered overseas. I didn't have any problems with printing the pattern as the sensibility website has some really helpful tips and how-tos, it was only when I started laying the pieces out that I started to feel daunted...
Wow. That's a lot of pages.


And the above picture is only half of the pattern! The other half contains 25 pieces not just 20! And to make the pattern usable I have to line up each individual page, tape it down, fill in the gaps between the lines, and then trace each pattern piece onto some more user friendly paper to produce my final pattern pieces. Whew! I'm exhausted and I haven't even started yet! Let along started sewing! Again, I'm probably just being over dramatic and getting this pattern ready will probably be an easier job than I'm anticipating, but next time I think I will stick with the pre-made paper pattern, just to make my life a bit easier! :)

Anyway, that's my progress so far, stop by for some more updates soon.
Bye for now!


Wednesday, 19 January 2011

Wednesday Wonderfuls #1

Wednesdays can be dreary things - you still have a whole other half of the week to go before you get to the weekend! - so I felt the need to banish those midweek blues with some bits of loveliness that have been making me happy. Enjoy!

  • I'm very excited to find out that A Stitch in Time Volume 2 is now available for pre-order (after my gushing post yesterday about Volume 1 I'm sure you can tell why!) with 60 new patterns to peruse. Happy days my fellow knitters!
  • Casey shows us how to spice up a plain cardigan with some gorgeous and too cute embroidery
  • I wish I'd had this anatomy of dressing when it's really cold to help me when we were being snowed in during December, I  could have looked stylish rather than like a snow beast!
  • Shae gives us a little look into the fashion of Boardwalk Empire, my new favourite television show.
  • I'd love to give one of Charlotte's 1940s pillbox hats a go...

And to finish a picture of me in my new jumper, as promised (although the weather here is still awful so it had to be an indoor shot, and the lighting still isn't brilliant, but there you go!) 

New jumpers make me happy
Happy Wednesday everyone! :)


Tuesday, 18 January 2011

Knit Knit Knit Knit Knitting

I love knitting, it gives me a contented feeling inside and satisfies my need to multitask by making sure that I'm never just sitting in front of the television doing nothing. Oh no. I'm sitting in front of the television and knitting. 

For quite some time I only worked from modern knitting patterns - in particular those by Rowan - but was never entirely satisfied with my finished garments. At the end of last year however I decided to try out a vintage pattern, after my Sweetheart requested a retro-style Christmas jumper to be made for him. After some searching online I discovered The Vintage Knitting Lady, ordered one of her many vintage patterns (a steal at £1.50 because it was a pdf file) and started knitting. And the jumper turned out beautifully, my Sweetheart wearing it for most of the festive season! Well I was just smitten. Vintage knitting patterns just seemed like the way forward. And, lucky old me, I was given a copy of the glorious book A Stitch In Time for my birthday and so I've now been able to knit up some lovely vintage jumpers for myself too!

Being a fan of fair isle, I chose the Fair Isle Yoke jumper as my first project from ASIT, and I can safely say that this was the most successful knitting venture I have ever been part of!

My version

The original

I chose different colours for the fair isle pattern than the ones suggested, only using shades of pink and blue rather adding orange and green, and I'm really happy with the finished look (although I apologise for the terrible lighting in my photos, it's a bit too dark outside to get good photos, curse this British winter...). I've already worn this jumper on five separate occasions since it was finished, and I'm sure it's set to become a firm favorite in my wardrobe during cold spells (which, let's face is, is most of the time in the UK!).

For my next and most recently completed project I chose Ena's Sweater, a lovely lacy pattern with button detailing at the shoulders, and once again I was very happy with the finished jumper.
My version
The original
I chose emerald green for this jumper, and I think it looks very classy, although I feel Gladys is not showing the jumper off at it's best! As soon as the weather is better I'll get outside and have some proper pictures of these sweaters taken I promise! I really am so happy with ASIT, it is stuffed with projects that I want to try, and the jumpers I have made so far are so pretty and wearable. In fact I have already got my next project in mind: Enchanting in Black and White.
Enchanting in Black and White

It's just so pretty! I can't wait to get started on it...

Oh, and while we're talking about knitting, let me share my dream knitting project with you:  The dressing gown from "Beads Buttons and Lace" by Jennie Atkinson.

O.M.G.
I don't care that it would take months and a small fortune to make. It's just beautiful. So pretty, so glamorous, and a little bit too much. Heaven! One day, my friends. One day.


Saturday, 15 January 2011

Fabric Fabric Everywhere

Yummy fabric!

Happy fabric day to me! There's something very satisfying about having a beautiful piece of uncut fabric just waiting to become a new garment, and, lucky old me, I have two such pieces of fabric today. These are supplies for the next two sew-alongs I'm going to take part in: Tasia's Pendrell Blouse sew-along and Casey's Swing Dress sew-along.

1. Pendrell Blouse Sew-along

Silk-satin modeled helpfully by Gladys 

For the pendrell blouse I selected this beautiful dusty pink silk-satin from one of my favourite fabric shops in Soho. It didn't come cheap, nearly £40 for 3 metres, but the drape is so gorgeous that I just couldn't resist! I think this blouse has the possibility of becoming a real favourite of mine.

2. Swing Dress Sew-along

Looking good Gladys!

For the Swing dress I found this gorgeous floral crepe on ebay - a steal at £13 for 3 metres including postage - and it arrived in the post the morning after I ordered it! It really is lovely stuff, and I think it'll look great in the 1940s style of the swing dress.

So I'm full of excitement about projects to come, and my Crepe sew-along is also coming along nicely. Basically I'm enjoying my weekend immensely and I hope you are too. I'll be back soon, but bye for now!


Related Posts Plugin for WordPress, Blogger...