Wednesday, 9 May 2012

Wednesday Wonderfuls #68 + #69

Hi there my lovely readers, happy Wednesday to you all!

First up I want to say a huge thank you to all your lovely comments on my Me-Made-May challenge so far, you guys are all so sweet! I'm really enjoying the whole thing, it's really given some of my older outfits a new lease of life :) A lot of you asked about my new cardigan made from "A Stitch in Time Volume 2", and never fear, this cardigan will have post all it's own some time soon.

But for now, it's bumper Wednesday Wonderfuls time! Coming up are the best bits of the blogosphere from both this week and the week before (when I was off enjoying Paree *le sigh*). But just before I share those pieces of joy with you, I just want to give you a sneak preview of my newest project. Remember when I learnt to crochet? Well, since then this has happened...


I am making my very first crochet blanket! I am absolutely addicted to it and it's coming along very nicely (this is my inspiration). There are sure to be many updates on this beauty in the weeks to come :)

But now it's Wednesday Wonderfuls time! Enjoy these yummies :)


That's it from me for today, have a wonderful rest of your week readers!

Katie x

Tuesday, 8 May 2012

Me Made May - Week 1


So it's the end of the first week of my first ever Me-Made-May, and things have been going well so far. Specifically choosing Me-Made outfits has made me revisit quite a few items of clothing that I haven't worn in a while, and I'm really pleased with how everything has been looking so far, plus it's been fun giving forgotten items a new lease of life.

But enough talk, let's have a look at what I've been wearing... (and yes, the first three days of May I was in Paris and I took full advantage of our private balcony for picture taking!)

Day One
Dress: Made by Me, Shrug: Made by Me

I wore this outfit on my first day in Paris and it was just perfect for the beautiful sunny weather! I love both these Me-Made items and I wear them a lot so this wasn't really much of a change for me.

Day Two
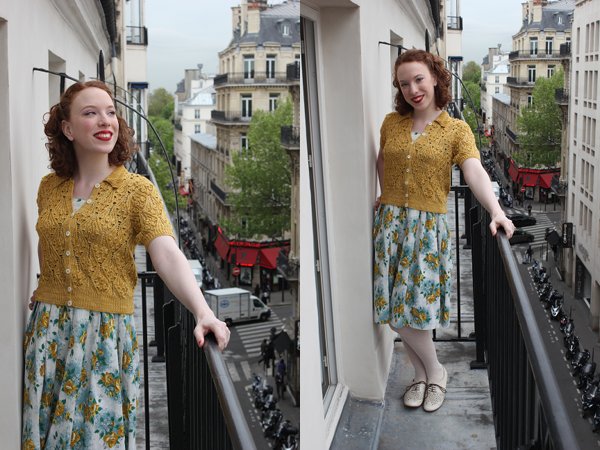
Cardigan: Made by Me

I finally finished my first knitting project from a Stich in Time 2, and don't you just love how it turned out? It's the only Me-Made item in this outfit, but it's a showstopper and I'm totally in love with it, I can see a lot of outfits using this cardigan in my future :) 

 Day Three
Dress: Made by Me

This ceylon dress is one of my first ever sewing projects but I love it so much I still wear it even though it lacks some of the detailing of my newer projects. It's my favourite colour and it matches my favourite lipstick perfectly!

 Day Four
Sweater: Made by Me, Skirt: Made by Me

And so I return home after Paris and my photo-taking becomes a little less fancy! :) This sweater is from A Stitch in Time 1 and doesn't get worn nearly as much as it should, so thanks Me-Made-May! It goes perfectly with my charity-shop-fabric skirt. Believe it or not this is a dressed down outfit for me :)

Day Five
Cardigan: Made by Me, Skirt: Vintage Re-vamped by Me

I told you that you'd be seeing the cardigan again! Mustard really is my new favourite colour :) This is a new combination for me but I really like how the cardigan goes with my checked skirt (a vintage purchase from Austria that I altered for the perfect fit).

Day Six
Dress: Made by Me

Another example of Me-Made-Made giving new life to a Me-Made item: this dress has hardly been worn since I completed it. I wasn't sure how to style it other than the way I originally wore it so it has just sat in my wardrobe. But I decided to give it another shot and so this rather cute concoction was born! I didn't think this dress could be pretty and girly but this look really works!

Day Seven
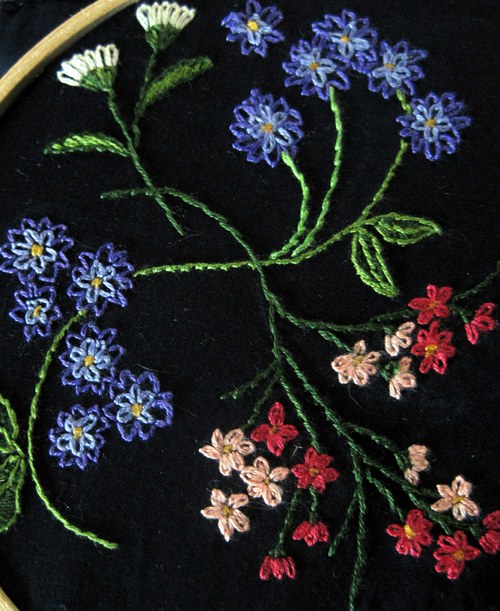
Skirt: Made and embroidered by Me

It's the return of my Pin Up skirt! I love this skirt and it makes everything more fun when I wear it. Getting it out of my wardrobe has really made me want to wear it more!

So there you have it, week one of the challenge over and all is going swimmingly so far! Are you taking part in Me-Made-May? How is it going for you so far?

Katie x

Monday, 7 May 2012

Guess who's back from Paris!

It's me! I'm back!

I can't believe that only a few days ago I was in beautiful Paree, where the sun was shining and now I'm back home and starting back at work tomorrow, ah well!

Paris was absolutely perfect, my Sweetheart and I had a wonderful time, it's still just as fabulous a city as I remembered :) But of course the blog has stil been going whilst I've been away, because of my wonderful guest bloggers! A huge thank you to Cassie, Sarah and Wendy for their beautiful posts, I'm sure you all enjoyed them as much as I did.

I'm trying to hold on to the memory of Paris for as long as possible, so here are some cheeky instagram shots to help me keep the magic alive :)

I'm just a Vintage Girl in Paris!

I will be sharing some proper Paris posts soon, all about my adventures (including numerous patisseries and fabric shopping!) and of course I'll be sharing the start of my Me-Made-May challenge, which has been going well so far :)

Paris je t'aime!

A brilliant time was had, but it is great to be home!

Bye for now,

Katie x

Friday, 4 May 2012

Guest Post by Wendy of Butterfly Balcony

Hello lovely readers! Today I am welcoming the wonderful Wendy to The Little Red Squirrel. I have been reading Wendy's blog for a long time now and I am always overcome with the beautiful pictures and projects she shares, I love her style so I'm very excited to have her share this hat DIY with you all (plus I wish I had had time to make one myself to wear in Paris!). So, without  further ado, here's Wendy!


Bonjour! My name's Wendy, I'm usual found at The Butterfly Balcony but today Katie has very kindly asked me to pop by to do a guest post for her while she is away on her Parisian adventure.


When Katie asked me to contribute to her blog I was seriously delighted, I instantly knew that I wanted my post to have a Parisian theme. So I had little look through my vintage pattern stash to find something wonderful for a tutorial, when I came across a delightful Leopard print hat in copy of Stitchcraft from Nov 1950, which it just so happens to be a Parisian Special!


So I set to work deciphering the rather vague vintage pattern and this is what I came up with...


Now mine is a little different to the original (the original has a peak and wire embellishments), but I think it is still rather smart and can be style to suit many eras. What I have created is essentially a Leopard print Juliet style skull cap which I am calling the 'Paris in Spring' Chapeau! It is a very simple pattern, perfect for a beginner, as it requires only 7 short machined seams and an inch and a half of hand stitching, which makes it super quick too! I do hope you like it! 


The 'Paris in Spring' Chapeau

What you’ll need:
  • Download the Free pattern HERE!
  • Leopard Print Faux Fur Fabric aprox 20“ square
  • Lining Fabric aprox 20” square
  • Cotton Thread in matching shade
  • Fine toothed comb (only if using fur)
  • Fabric marker or chalk.
  • Cotton tea towel
1.  Find which way the pile of the fur fabric lies. I find that it helps to use a comb to brush it all in to the same direction.

2. Turn your fabric over so that you have the woven back facing you and the pile of the fabric is brushed down from the top edge of your fabric. Place the pattern pieces matching the arrows to the direction of the pile.

3. Trace around the pattern with chalk or a fabric marker, ensuring to mark all triangular notches. I found it invaluable to mark which pieces are which as they all start to look the same once cut.


4. Cut out pattern. You essentially only want to cut the backing fabric not the hairs, I find that the best way to ensure that you don’t accidentally cut off chunks of fur is to wiggle the underneath blade of the scissors whilst slightly pushing against the fabric before sniping, this will move the strands out of the way of the blade and prevent accidental hair loss!

5. Now that your covered from head to toe in fluff :) Its time to cut out the same pieces from your chosen lining fabric.   VERY IMPORTANT: You will need to cut your pattern pieces out so that the bias (stretchy bit) runs across in a straight line the brim edge. if you do not do this you will find inserting the lining much more difficult and you will find that it may cause your outer fabric to pucker and not lay flat.


Tip:  As you pin the seams on the fur fabric tuck in any stray hairs that run along the edge, this will make judging the seam width easier and also save you time at the end.

6. With right sides together pin the F and LS together along marked edge. Stitch seam. 


 7. With right sides together pin the B and RS together along marked edge. Stitch seam.

8. Open out seams and press them flat. With right sides together match up F/LS and B/RS pin along curved seam. Stitch.

9. Repeat the process from 7-9 for lining fabric.


10. Place lining fabric over fur fabric right sides together match seams. Turn inside out so that the fur fabric is on the outside. You may want to pin the seams at crown to stop it from moving.


11. Pin the lining fabric in place whilst pulling it down about 1 cm below the edge of the fur fabric (see photo), this will ensure that when you turn your hat the correct way round the fur will pull up underneath slightly hiding your lining.

12. Mark the back section you will need to leave about 1.5” gap in your stitching for turning the hat the correct way round I marked mine with crossed pins.


13. Stitch all around brim removing the pins as you go.


14. Turn the right way out, by pulling through the opening to check that you are happy with your placement and seam. Once Happy turn back inside out again and trim brim edge seam.


DO NOT TRIM THE FABRIC BELOW THE OPENING


15. Turn your hat the right way out again. Now you will need to pin around the brim working the fur fabric under the brim. When happy with the placement baste/tack this in place.

Now The Dangerous Bit! 

16. Be very careful you do not want to melt your new creation, or your fingers! With the inside of the hat facing up, cover with a protective later (I used a cotton tea towel)
Set your iron to a medium/cool setting and gently press the brim area to give the edge definition.

Tip: I found it helpful to mist the hat's lining with a little water before covering with the tea towel, it helped it take shape better.

17. Nearly done! Hand stitch the opening at the back closed.


18. Finally comb your fur fabric to smooth out. Then using a pin or fine knitting needle work around the seams loosening any hairs that have got trapped in the seams.
C'est tout! You're done!


Now its time for the fun bit!!
To secure your hat to you head you can use hat pins (be careful), stitch in a couple of hair slide combs, or my preferred option is to use a girls best friend the Kirby grip to hold it in place I find the the fluff of the fur fabric disguises the clips rather well and it feels much more secure.


So there you have it, your very own Leopard print chapeau to rival those of only the most glamorous of screen stars!
Wendy x

Thursday, 3 May 2012

Guest Post by Sarah Gilbert of Rhinestones and Telephones!

For today's guest post please allow me to introduce you to the lovely Sarah from Rhinestones and Telephones! I have admired Sarah's blog for a long while, she's always so creative and sews up such wonderful things, so I know I'm leaving you in capable hands. Enjoy!

Source: google.ca via Sarah on Pinterest

I am so delighted to have been asked by Katie to write a guest post whilst she is away exploring Paris.  While I am (not to secretly) envious of her marvellous trip, I was also inspired by it.

Paris is one of my dream destinations and one place where my Thrifty365 pledge would be tossed out the window.  In Paris, I would have absolutely no compunction about shopping up a storm! Everything from vintage shops, to fabric shops, to curio shops.  I would especially love to visit their open air antique markets, too.  Heaven!

Source: google.ca via Sarah on Pinterest

Now, with all of these shopping plans, I would need to leave considerable room in my luggage.   With that in mind, a capsule wardrobe seems just the ticket; especially one inspired by the gorgeous destination.


Source: rhinestonesandtelephones.polyvore.com via Sarah on Pinterest


Each piece easily mixes and matches and requires minimal care,  i.e. ironing, and I've added pops of red for interest.  I would plan on walking a lot in Paris, so comfortable shoes for day are a must, as well as an elegant cocktail dress and heels for evening.  The red shawl can easily be paired with the sparkly cardigan and cigarette pants for day and then elegantly tossed over your shoulders for  evening.

What pieces would you put in your travel capsule wardrobe?  What is your dream destination?

Wednesday, 2 May 2012

Wednesday Wonderfuls - Wonderful People!

Now I'm not writing a proper Wednesday Wonderfuls post this week because of my blogging break, which means I'll do a bumper addition next week, two whole week sof Wonderfuls how exciting! But for this week I thought I'd focus on some Wonderful People instead, namely the Wonderful People who are guest bloggers for me this week!

I find everyone of these lovely ladies very inspirational, so I felt I just had to introduce them all to you properly (if, of course, you haven't already come across their blogs and love them as much as I do!). So here they are, my Wonderful Guest bloggers:

Tuesday: Cassie!

Image source

Yesterday's guest blogger was the lovely Cassie with her beautiful embroidery how-to, didn't you just love it?! 

I first discovered Cassie's blog through her beautiful belts which you can purchase on etsy. My Sweetheart gave me one of her bunny belts as a Birthday present and I've been hooked on them ever since! So of course when I found out that Cassie had a blog I knew that I had to give it a read, and I've been an avid admirer ever since :)

My favourite part of Cassie's blog would definitely be her outfit posts, seeing what she wears to work each day really brings a breath of fresh air and beams of sunshine into my life! She has recently started matching her outfits to works of art, how fun is that?

My personal pick of Cassie's blog is her DIY shoes post, I would like one of every single pair!


Thursday: Sarah!

Image source

Tomorrow we have a beautiful Parisian themed post by the lovely Sarah of Rhinestones and Telephones, I love it and can't wait for you to see it :)

I first discovered Sarah's blog quite recently through the Sew Colette Challenge that she has been hosting, which is great by the way. Since then I have loved reading her posts and I particularly appreciate her love of Downton Abbey - a kindred spirit!

My favourite part of Sarah's blog is probably her finished projects, I have serious envy of her sewing skills! Every item of clothing that she makes is beautiful and suits her personal style perfectly.

My personal pick of Sarah's blog is this blouse inspired by Lady Edith of Downton Abbey. I love the floral fabric and it looks so good on her!


Friday: Wendy!

Image source

My final guest blogger is the lovely Wendy, who is sharing a hat DIY that I'm a little bit obsessed with, seriously, it's awesome!

I first discovered Wendy's blog... I'm not going to lie, I've been reading her blog for such a long time that I've forgotten how it all started! But basically, Wendy's blog has been a firm favourite of mind ever since I started readin blogs and even more so when I started writing one myself. Her blog is always beautiful and I guarantee it will brighten up your day.

My favourite part of Wendy's blog is when she collects screen captions from beautiful films and creates equally beautiful collages of them. I don't know how she has the patience, they are ridiculously good!

My personal pick of Wendy's blog is this post, BBC South Riding - A 1930s Fashion Fest, talk about eye candy :) I love this adaptation almost as much as I love Wendy's blog!


Now, I don't know about you, but I think that they're all pretty Wonderful :)

I know I've left you all in good hands while I'm away!

Bye for now!

Katie x

Tuesday, 1 May 2012

Guest Post by Cassie Stephens

Today I'm thrilled to say we have a guest post from the lovely Cassie Stephens, my first ever guest blogger! If you don't already own one of her beautiful belts you really should - I own three of them and adore them all! She has a wonderful blog full of gorgeous pictures and beautiful creative ideas, so I'm very happy to have her here today. Take it away Cassie!

Okay, if you couldn’t tell already, I’m a bit of an extremist. I mean, if you’re gonna go floral, you might as well paint ‘em on your walls, stick ‘em in your hair and embroider them onto your dress, right?

Greetings from Nashville, Tennesse! I’m so excited to be a guest on The Little Red Squirrel and chatting with all of Katie’s lovely readers today.

My name is Cassie and I am an elementary art teacher, crafter and lover of all things vintage-y. I have been so inspired by the idea behind Katie’s blog of either creating one’s own clothing or buying vintage. It’s such a thrill to see her latest knitted garment or handmade dress. She doesn’t know this, but her adorable circle skirt with the embroidered vintage gals was the reason I picked up my embroidery hoop, needle and thread again. So I thought it appropriate to share with you my latest embroidered venture!

Just a little close-up. I’ve had this very comfortable yet pretty boring dress in my closet for years. It seemed like the perfect blank canvas for some embellishment.

Embroidery has a special place in my crafty heart. During my summers, I often stayed with my very artistic grandmother. We would spend time on her porch with hoops on our laps and glasses of iced tea at our feet. I loved the idea of creating a picture with a needle and thread. Her favorite motifs were Native Americans while I favored teddy bears and balloons. I’ve since moved on to rainbows and unicorns. I’ve grown up a lot since then.

Please pardon the cat hair. I have an oversized kitty that sees my arm as her permanent resting place which makes embroidery, brushing one’s teeth, eating and typing extremely difficult.

Interested in adding a little embroidery pizzazz to your look? It’s so easy and fun. All you need are the following:

    Cotton dress (this dress is both cotton and jersey knit. I embroidered on the cotton only)
Embroidery floss
Adjustable hoop
Embroidery needles
White pencil


Now, before I explain this, let me just say that yes, I am a teacher, so I can kinda-sorta explain things in an semi-coherent manner. However, I’m a little scattered and my embroidery methods are not traditional. So, if you’re cool with that, here you go:

1.   If you are working with dark fabric, you can trace your design. I had an idea in mind, so I drew directly onto the fabric with a white pencil.
2.  Always keep your fabric stretched taunt to insure a flat finish. No one likes weird bulges.
3.   Cut your embroidery thread to a 9” length and separate into two threads from the six.
4.  Tie a knot to the end of the thread and begin to trace over your pencil lines with the thread.


It really is that easy! I tried my hand at some floral stitches for this particular project. There are countless places on the internet that can easily walk you through these types of stitches. My favorite part is coming up with my own design and creating something that is truly unique.


I do hope you’ve enjoyed this little DIY as much as I have sharing it with you. Thank you, Katie, for the chance to have a chat with your sweet readers. If ya’ll would like, feel free to drop by my little blog at cassiestephens.blogspot.com. Thanks for reading!
Related Posts Plugin for WordPress, Blogger...