Monday, 5 November 2012

The Birmingham Bloggers Meet Up!

Hello there my lovely readers! A very happy Monday to you all, I hope you had good weekends. I certainly did as I spent most of my Saturday trotting around the fabric shops of Birmingham with a truly marvellous group of fellow bloggers. Here they are in all their glory!

Back Row: Roisin, Alice, Helen, Me, Steph, Helen, Rachel, Mellie, Catherine, Amy and Suzy
Front Row: Karen, Winnie, Claire and Kat
(Marie was taking the picture and Charlotte had left by this point!)

This get together was organised by the lovely Kat and Marie and I am so happy that they did! It was a great day, and it was lovely to meet the authors of blogs that I have been reading for a long time (putting a face to the blog if you will!) and meeting lots of new bloggers too. It was the first big blogger meeting that I have been to, and although I was quite nervous on my journey to Birmingham as soon as I met everyone I was instantly put at my ease and soon we were all chatting away like old friends :) I can't tell you how nice it was to spend a whole day talking about sewing, notions, fabric, patterns, knitting and generally all things crafty. If you want the details of our day out then check out Marie's post, she'll give you low down of everywhere we went and what we got up to! (Lots of other bloggers from the meet up have already blogged about our adventures too, so if you're interested you can also check out Rachel, Karen, Helen, Amy, Alice, Roisin and Helen's blogs!)

Anyways, want to see my swag??

After one of the most amazing swaps I have ever seen (I may have brought a few too many patterns with me...!) I walked away with three vintage knitting patterns, two gorgeous dress patterns, a whole load of yarn and, can you believe it, my very own sleeve board complete with cover! How lucky am I? I can't believe that I got all these lovelies for FREE. Amazing :)


When it came to the actual purchasing of fabrics at the amazing Rag Market I was fairly reserved. After all six metres of wool isn't too much, is it?! I spotted the most beautiful tan italian wool on one of the stalls of the outdoor market almost as soon as we started to browse and I fell in love. When I learnt that it was £5 per metre I was sold. It's so soft I have been obsessively stroking it ever since I got it home! My second and final purchase of the day was from the indoor market. Helen and I spotted this beautiful claret wool at the same time and we both came away with 3 metres of it. Perhaps at the next blogger meet up we'll be sporting matching outfits? :)

General wooly goodness!

And I've already picked out a couple of patterns from my stash for these wools, have a look at what I'm planning...

A New Look style suit in Italian Wool, happy days!

Gertie's Wiggle Dress would look so gorgeous in this colour!

It was a wonderful day and I'm very much looking forward to (and hoping for!) the next one! Thanks girls for making the day so great, it was so lovely to meet every one of you :)

Katie xxx

P.S. The beady eyed among you may have noticed that I might be wearing a plaid cape in the above picture... Yes, it's finished! I will be getting the last few construction posts up over the next couple of days before it's big blog reveal, but rest assured it was a great success and was ridiculously comfy to wear!

Friday, 2 November 2012

A Cape Adventure #3 - Pad Stitching the Collar


Pad stitching is one of my favourite parts of hand-tailoring! I find all the little hand stitches very relaxing and I love to see the shape of the collar change as I work in it. For those of you unfamiliar to pad stitching it's basically a way to help your collar keep it's shape beautifully through lots of tiny hand stitches and steaming. Gertie shows us how to pad stich in this fancy tutorial, check it out, she explains the whole things much better than I ever could!

Here are a few shots of my newly pad stitched under collar, I love it so much, all the stitches make me happy!


And here you can see the teeny tiny stitches on the stand (the area of the collar below the roll line). These too make me happy :)


I am loving all the hand tailoring I have been able to do on this cape so far, and there is more to come! Next time I tackle something I've never tried before: Welt Pockets!

Bye for now!

Katie xxx

Wednesday, 31 October 2012

Wednesday Wonderfuls #94

Happy Wednesday my lovely readers, and Happy Halloween! I am particularly happy today because my Sweetheart and I are celebrating our three year anniversary. This year has been pretty big for us, what with our having to spend so much time apart with all my touring, but this has just made us stronger and now we are living together! I really cannot believe that we've only been together for three years because I feel like I've known him for my whole life! He truly is my best friend and soulmate and I couldn't be happier :)


I am one lucky girl! So you could say that things are going pretty well around here at the moment, what with my anniversary together with some serious home baking and sewing, I had a great week! 

Images, Each Row, Left to Right:
1. Fancy Anniversary hair, 2.Pretty nails, 3. I love vintage clothing labels!
4. Chocolate and raspberry brownies 5. Is that a collar I see...? 6. Homemade scones
7. Anniversary flowers! 8. Lemon cupcake making 9. I love a good bow!

But enough about me! Let's see what else has been going on in the blogosphere this week...


Have a great rest of the week my lovely readers, I know I will!

Bye for now,

Katie xxx

Tuesday, 30 October 2012

A Cape Adventure #2 - Matching Plaid and Bound Buttonholes


Matching Plaid

When working with plaid you have one of two options. Either you can do what all the ready-to-wear manufacturers do and disregard the need for matching the pattern properly, or you can take the definitely-more-professional-but-also-crazy method and meticulously match your plaid. Any guesses as to which route I ended up taking?!

Ok, so there was never any question as to whether or not I would match my plaid, to me it just seems crazy to spend money on such a beautiful high quality fabric and then not do things properly! However, believe me my friends, there is a good reason why high street chains do not take the trouble to match their plaid: it is seriously hard work!

There are all kinds of different tutorials online about how to match plaid, but I decided to use this brilliant how to by the incredibly talented seamstress Tasia of Sewaholic. Tasia's technique (in the most basic sense) involves pinning through your double layer of fabric, matching the plaid at every pin. And we are talking a lot of pins here, and a lot of time spent! 

Pins, pins everywhere...

The experience of pinning my entire length of wool fabric before cutting out my pieces made me appreciate just how time consuming working with plaid really is! And then of course you have to make sure that every one of your pieces is cut so that the plaid will align nicely at the seams, and the the center back of the cape and the collar match, and that the interfacing line up nicely with the outside of the cape, the list could go on and on! But when you see each one of your fabric pieces laid out and perfectly aligned and matched it's really worth it (at least for obsessive compulsives like me!). 

And after all that plaid matching you are ready to cut out your fabric pieces and start sewing! And the first step in my tailoring is going to be...

Bound Buttonholes

This is not my first foray into bound buttonholes, but my previous attempts haven't always been the prettiest of things! This time I was determined to get them right and take my time with them. I used this great tutorial from the Coletterie, which worked really well for me. Before I have used a method in which you make a window in the fashion fabric and form a separate little fabric window behind it, but I much prefer the Coletterie patch method in which these two steps are combined into one. All four (I have added an extra buttonhole after lengthening the hem) buttonholes are looking very pretty indeed!

My small but perfectly formed bound buttonhole :)

Things are going well with my Cape Adventure so far, next time I'll start on my pad stitched collar!

Bye for now!

Katie xxx

Monday, 29 October 2012

A Cape Adventure #1 - Alterations to the Pattern


Welcome to the first part of my mammoth new challenge: sewing and hand tailoring a cape with not instructions! Before I started tackling this bad boy there a few changes that I needed to make to the basic pattern:

1. Lengthen the hem
The little cropped cape is very cute but not particularly practical for the notoriously cold English winter, so I want to lengthen the cape by 4 inches, so that it ends just below waist height. That should help keep me a bit warmer! This will be a pretty simple slash and spread job, no fancy techniques required here :)

2. Move the pockets and make them REAL
The pattern pieces included in this pattern are only enough for faux welt pockets, i.e. there is only one piece (the welt pocket piece) provided. Now I know that these pockets are pretty teeny tiny, but I want then to be real not fake, so I will need to draft my own pattern pieces for the pocket bag and pocket underlay. And I'll also have to relocate these now real pockets 4 inches further down to match the extended hem.

3. Draft facings
So, it makes no sense to me that a gorgeous little cape wouldn't have any facings at all, the creator of this pattern literally wanted pretty much raw edges inside this little number! I know, they must have been insane! It's madness I tell you! Anyway, to appease my rather OCD personality I'm going to draft my own facings for both the front and back pieces of this cape, giving it a much neater, prettier and more professional looking finish (I hope!) This will be pretty simple, I know Gertie did a how to about drafting facings in one of her sewalongs, and how can I go wrong with Gertie as my guide?

4. Add a Lining
Oh, and did I mention that facings alone aren't enough for me? I want to add a lining as well for good measure. Because I'm winging it and that means that I can add whatever I want to the pattern and I want a lining :) Plus it will make my OCDness even happier because all those naughty little raw edges will be hidden away inside said lining. Happy times. 

On top of these basic changes I am also going to tackle bound buttonholes, a pad stitched collar and of course go to extreme lengths to match my plaid exactly. It's all very exciting! I'll be back tomorrow with more about the joys of matching plaid (seriously though, it's hard work!) and bound buttonholes.

Bye for now!

Katie xxx

Sunday, 28 October 2012

My Completed Ripple Blanket - at last!!

 I can finally give you an update on my second ever crochet blanket - it's finished!


This blanket has been weighing on my creative mind for a long time, I didn't feel like it would ever be finished! The actual design itself (found here on the fabulous blog Attic 24, an amazing source of crochet inspiration) is pretty simple and is great fun to do - I found crocheting this blanket very soothing and relaxing - but the problem was I didn't know when to stop! I used a repeat of six different colours, which I ended up repeating five times which created a pretty huge blanket (a lot of backstage crocheting hours went into this creation!). But at last it's finished, and just in time for the chilly weather :)


 The main purpose of this blanket at the moment is to help hide our uber-gross rental sofa, an off-cream leather monstrosity that taunts me with it's lack of style. The curse of renting a place means that no matter how much you long for a 1950s mad men-esque blue/green couch you are stuck with what you've been provided for at least a year, so you just have to suck it up and make it work. So until I have the time (and the funds!) to run up a cover for this sofa in some pretty fabric I will disguise it with soft wooly blankets!

Until we have room for a puppy of our own these pillows will have to suffice! I want a little pug baby so badly! 

Did I mention what my choice of a second dog would be...? :)

I really couldn't have finished this blanket at a better time, as it has already kept me and my Sweetheart warm on the sofa and nice and cosy in bed, it's certainly worth the time it took to make! I love it and it has definitely solidified my love of all things crochet, but I think it's time that I brought out my knitting needles for my next project, I have missed them.

Do you like my above-the-sofa print? I just love it!

Have a wonderful weekend my lovely readers!

Bye for now!

Katie xxx

Thursday, 25 October 2012

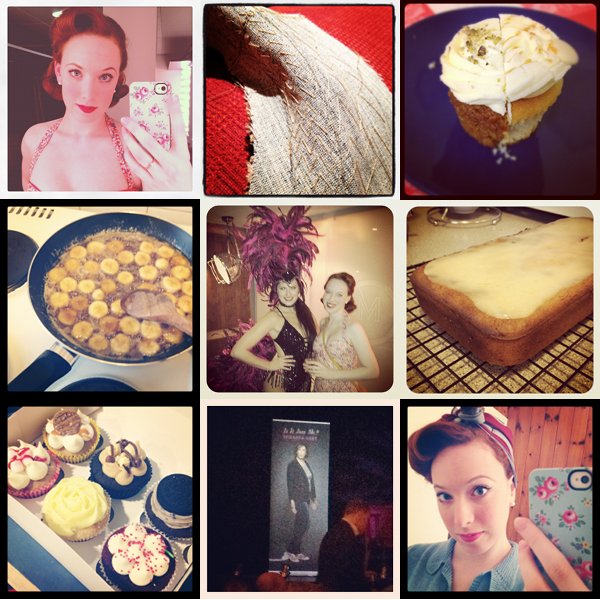
Wednesday Wonderfuls #93

Hello there lovely readers, let's pretend it's still Wednesday shall we? I've been enjoying being back home so much over the past few days that my Wednesday Wonderfuls quite slipped my mind yesterday, I hope you'll forgive me! But here they are today, just as wonderful as ever :)

Images, Each Row from Left to Right:
1. Fancy last show party hair! 2. Pad stitching :) 3. A hybrid cupcake from my Sweetheart!
4. Casually caramelising some bananas. 5. My fancy new friend! 6. Bananananana bread
7. Cupcakes for sharing (or maybe not...!) 8. Let's meet Miranda Hart! 9. Headscarf hair

I haven't yet had time to stop and realise that the show is over, I've been so bus y since I've been home! Unpacking alone was a huge task, but I've also been lucky enough to spend lots of time with my lovely friends and family and my gorgeous Sweetheart. I've been baking and knitting and crocheting and throughly enjoying myself, and of course I finally have time to tackle my new sewing adventure, I'm so excited to show you what I've been up to!

But for now it's Wednesday Wonderfuls time!

Well that's it for another week of Wonderfuls, have a great rest of the week my lovely readers!

Bye for now,

Katie xxx
Related Posts Plugin for WordPress, Blogger...