Wednesday, 21 November 2012

Wednesday Wonderfuls #97

Hello there my lovely readers! A very happy Wednesday to you all :)

First of all thank you all so much for your lovely comments on my recently completed cape, I love it so it means a lot that you all love it too! Thanks for making my week :)

It's been a fairly busy week in my part of the world, I've started working a "real job" (as opposed to theatrical work!) so that was a bit of a rude awakening! But it's been nice to have some purpose to my days, too much spare time can make you go a bit cuckoo :) All in all everything is great, and I'm really looking forward to the run up to Christmas!

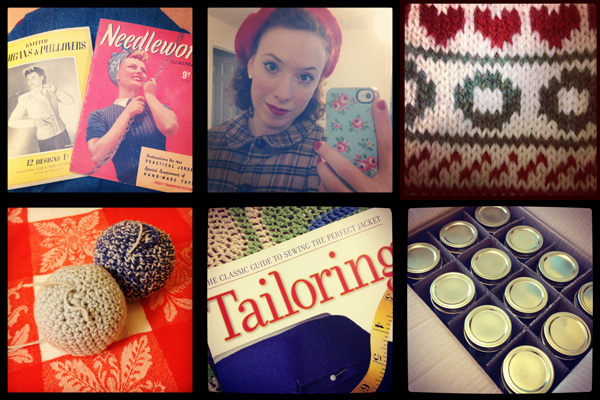
Images, Clockwise from Top Left:
1. A little treat for myself, 2. Getting ready for a cape photo shoot! 3. More Christmas knitting...
4. The Christmas crafting begins! 5. Reading up on my new love 6. Crocheting Christmas baubles!

It wouldn't be Wednesday without some Wonderfuls, so let's take a look at some lovely bits and pieces from around the blogosphere this week:


Have a great rest of the week!

Bye for now,

Katie xxx
A Cape Adventure #6 - The Big Reveal!


Hello there my lovely readers! The big day is finally here, it's time to reveal my cape in all it's plaid wooly glory, take a look!


My Sweetheart and I had a lot of fun trotting about the town near our new flat to take these pictures, and I think they've turned out pretty well! Plus, even though the weather was grim, I was nice and cozy in my wooly ensemble :)


Out of everything I have ever sewn I have to say that this cape is definitely my proudest achievement. I really wasn't sure if I would be able to do it justice considering my complete lack of instructions, but it's all come together better than I could have hoped in the end! I am in love with wool and in love with tailoring and I cannot wait to start my next project!


Thanks for following my cape adventure, I hope that the reveal was worth the wait! 

Bye for now,

Katie xxx

Tuesday, 20 November 2012

A Cape Adventure #5 - Finishing touches, the lining and the skirt!


The end is finally in sight my lovely readers, it's almost time for the big reveal of my finished cape! But first let me show you the last few details of it's construction, if you can stand it!

First up, I forgot to mention earlier that during the construction of the cape I added a back stay piece, as you can see below:


This back stay was made of muslin and was stitched to the back piece to give the cape more structure. From then onwards the back stay and back piece were treated as one. I also finished the lower edge of the back stay with pinking shears to avoid any extra bulk. 

Next up is the lining of the cape. I used a lovely cotton sateen for the lining as I love using natural fibres for linings, it's so much nicer against the skin! The original pattern didn't call for a lining, so I just used the back and front pattern pieces as a guide and drafted my own lining pieces. The main difference that I added to these pattern pieces was adding an inch to the centre of the back piece (meaning I added two inches in total) in order to have a central pleat in the lining back. This pleat prevents tightness and tearing in your lining as you are giving yourself a little bit of extra ease as the lining of jackets (and capes!) tend to get pulled about a fair bit!


The lining pieces were also changed in order to match up with my self-drafted facings, which you can see below:


And there you have it, the cape is completed! But my aim was always have have a complete plaid outfit from my gorgeous Scottish wool, so of course I needed a pencil skirt to match! And here it is, made from the Pencil Skirt pattern from the fabulous "Gertie's New Book for Better Sewing":


I adored this pattern, I actually cannot wait to try more patterns from this book because the pencil skirt was such a pleasure to make! (And I may already have a few projects from this book in the pipeline...!) In case you were wondering this is what the internal working of this skirt look like:


I tried a couple of fancy techniques on this skirt, all of which were great fun, but looking back they weren't exactly necessary! I underlined the whole of the skirt in silk organza so that I could hem it completely invisibly, however the wool I used was very forgiving so this was a little bit of overkill! I also used a length of vintage seam binding on the hem, which wasn't really needed as the skirt was fully lined, but I love how it looks so much I really don't mind :)


So there you have it, construction is complete and here it all is in all it's glory!


What do you think of my outfit? I must admit I am totally and utterly in love with it, tailoring is definitely my new passion, I love it more than any other kind of sewing, and I adore all kinds of sewing! Stay tuned because soon I'll be sharing some shots of myself in my plaid wooly ensemble, I can't wait!

Thanks for sharing my cape journey with me, I hope you've enjoyed it all as much as I have!

Bye for now!

Katie xxx

Wednesday, 14 November 2012

Wednesday Wonderful #96

Hello my lovely readers and a very happy Wednesday to you all!

It's been a little bit quieter this week in my corner of the world, I've been doing lots of baking and crafting, mostly preparing for all my Christmas (I've finally said it!) projects. I like to get organised fairly early so it's not all left to the last minute! I'll give you lots of updates when things start getting finished :) Other than that I've just been enjoying the Autumn/Winter weather, it really is my favourite time of year!

Images, Each Row from Left to Right:
1. Pinwheel biscuits! 2. Autumnal adventures :) 3. Wool heaven!
4. I'm going to lick this now... 5. A little bit of festive knitting 6. Homemade marshmallows!
7. Walks in the park 8. My new goosey friend :) 9. Mini loaves are full of joy :)

BUt enough about me, let's see what's been going on in the marvellous blogosphere this week!


That's it from me for now, but I'll be back soon.

Bye for now!

Katie xxx

Tuesday, 13 November 2012

A bit of Spring (in Winter) Cleaning!

Hello lovely readers! 

Now... I have a bit of a confession to make. I have been  buying quite a bit of fabric recently. It started at the Bloggers meet up in Birmingham, where I bought some gorgeous pieces of fabric goodness, but then last week, believing that I was only going to shop for Christmas fabric, I visited Goldhawk Road and may have been a little bit naughty... Basically I am now inundated with winter-weight fabrics, all ready to be sewn up, but I have nowhere to put them! I have two main fabric storage areas in my flat: under my sewing table, where I keep a pile of fabrics that I already have patterns in mind for, and then I have a large stash of extra fabrics, cut offs etc., in a plastic box under my bed. So in order to make room for all my new pretties, I did some serious reorganising. This is the new under-the-desk pile!

The bottom five are all wool, I think I have a problem...!

All focused and ready for winter-weather sewing! I have moved all of my spring/summer weight fabrics (all my pretty vintage cottons and novelty prints) into the under-bed box, all ready to be taken out and played with when it gets warmer again. I also went through all the fabrics that I have been storing in this box and had a brutal selection process as to what was staying and what was going. Anything that I have been keeping for a long time but not actually using has to go. Plus I have a habit of over buying when it comes to the amount of fabric I need for a project, so I have a lot of quite large off cuts that are leaving the stash too. All these unwanted pieces of fabric (together with quite a lot of vintage dress patterns) are going to be finding their way onto ebay over the next few days. I'm sure that someone will want them for something, there are some pretty nice bits and pieces, so I will put the listings up here as soon as they go live, in case any of you fancy having a browse :)

So who says that spring cleaning only happens in spring? Is anyone else having a bit of a reorganise for winter?

Bye for now!

Katie xxx

Wednesday, 7 November 2012

Wednesday Wonderfuls #95

Hello there my lovely readers and a very happy Wednesday to you!

It's been a great week in the world of the Little Red Squirrel, what with the Birmingham bloggers meet up and lots of sewing, knitting and cooking, it's been great :) I've even started planning my crafty projects for a certain upcoming festive season (I can't quite bring myself to say the "C" word yet!) so I'm feeling pretty smug and very organised. I hope you've all had a good week too!

Images, Clockwise from Top Left:
1. My first taste of pumpkin pie! 2. I love my nifty little badge :) 3. Homemade chicken pot pie
4. I love happy post, 5. Knitting up my Greta turban, 6. Nom nom nom chicken nom pot nom pie nom

Let's take a look at the wonderful things that have been happening on the blogosphere this week...

Have a great rest of the week my lovely readers and I'll be back with more bloggy goodness soon!

Bye for now!

Katie xxx

A Cape Adventure #4 - Welt Pockets


Hello my lovely readers and welcome to the next step on my cape making adventure: Welt Pockets!

Now you may remember that the original pattern was only supposed to have faux pockets which meant only the welt pattern piece was included. In order to create useable pockets I had to draft my own pieces for the pocket underlay and the pocket bag. 


Once this drafting was done I was ready to cut out my fabric (the welt and the underlay in the plaid wool and the pocket bag in a cotton sateen I am using for the lining) and start the construction of my welt pockets!

The construction of a welt pocket is very similar to the construction of a bound buttonhole, insofar as you sew a lot of fiddly pieces on the right side of your fabric before cutting into your fabric and passing all these fiddly pieces to the wrong side to create your neat little pocket! Well, that's how I see it, but if you want it explained properly then take a look at this how to from the Coletterie, it's great and will tell you all you need to know about welt pockets! 

I've taken a few shots of my own construction of my welt pockets to show you the process a bit more broken down...

First up I marked the placement of my pockets on the right side of my front pieces. Some people prefer to mark with fabric markers or chalk but I find that pins work fine.


To make sure that my pockets are exactly level I made sure that the pins were mirroring each other in their plaid placement. This is one of those moments where working with plaid is actually a help rather than a hinderance! After marking these points I reenforced these areas with weft interfacing (on the wrong side of the fabric) as they about to get a lot of wear and tear!


Next up you need to construct the separate parts of the pocket. The welt pieces are sewn together along both short edges and one long edge, the seams trimmed and graded and then the welt turned right side out and pressed. The pocket underlay is sewn to the upper pocket piece, and both the welt and the upper pocket need a row of stitching 1/4 inch away from the raw edge for the welt and the top edge for the upper pocket (this row can be seen in the second picture below)

The welt, pinned and ready to be stitched, trimmed, graded, turned and pressed!
The welt and upper pocket, stitched to the front of the cape

This 1/4 row of stitching is the one you will sew over to attach these pieces of the pocket to the cape front. The welt pocket stitching line is sewn completely but the upper pocket is sewn about 1/8 inch short of the welt line on each end, so that the pocket bag will fit neatly inside the welt and will not be seen. After this stitching is done, very much like a bound buttonhole, you make an incision (my goodness, it sounds like surgery doesn't it?!) on your pocket line (in my case the line between my two pins) and then flip the upper pocket and the welt to the inside. I cannot stress how much you should go and check out the Coletterie tutorial if this isn't making any sense, their directions are very clear and I am aware that I'm rambling quite a bit! Plus I really didn't take as many pictures as I should have done!

In the below picture you can see that the upper pocket and underlay have been turned to the inside and my welt is still lying flat.


It was at this point that my camera didn't want to play ball anymore so I went on and completed my welt pockets without taking any more photos. To be honest, once you have passed this point the scary bit is over and the final steps are quite simple. Once again I direct you to the Coletterie tutorial where they will show you how to attach your lower pocket to the raw edge of the welt, stitch down the little triangles you made during the cutting of the window to the pocket underlay, sew the upper and lower pocket bag pieces together and finally fell stitch the edges of the welt pocket down to the cape front to finish. Believe me, it's all a lot less complicated than it sounds!

Anyways, here are my completed welt pockets:


It's all looking pretty good isn't it? At this point, as well as completing the welt pockets, I have attached my upper collar to the pad stitched lower collar, - the upper collar was interfaced with some weft so that it would match the weight of the lower collar - trimmed and graded the seams, turned it out and pressed it and under-stitched the collar by hand so that the seam favours to the underside of the collar. I have also sewn the front cape pieces to the back piece and have attached the under collar to the cape. It's definitely starting to look like more cape-ish isn't it?

Anyway, I think that's quite enough waffling from me for one day, but I'll be back soon with more updates on this Cape Adventure, it won't be long now until it's big reveal!

Bye for now,

Katie xxx

Monday, 5 November 2012

The Birmingham Bloggers Meet Up!

Hello there my lovely readers! A very happy Monday to you all, I hope you had good weekends. I certainly did as I spent most of my Saturday trotting around the fabric shops of Birmingham with a truly marvellous group of fellow bloggers. Here they are in all their glory!

Back Row: Roisin, Alice, Helen, Me, Steph, Helen, Rachel, Mellie, Catherine, Amy and Suzy
Front Row: Karen, Winnie, Claire and Kat
(Marie was taking the picture and Charlotte had left by this point!)

This get together was organised by the lovely Kat and Marie and I am so happy that they did! It was a great day, and it was lovely to meet the authors of blogs that I have been reading for a long time (putting a face to the blog if you will!) and meeting lots of new bloggers too. It was the first big blogger meeting that I have been to, and although I was quite nervous on my journey to Birmingham as soon as I met everyone I was instantly put at my ease and soon we were all chatting away like old friends :) I can't tell you how nice it was to spend a whole day talking about sewing, notions, fabric, patterns, knitting and generally all things crafty. If you want the details of our day out then check out Marie's post, she'll give you low down of everywhere we went and what we got up to! (Lots of other bloggers from the meet up have already blogged about our adventures too, so if you're interested you can also check out Rachel, Karen, Helen, Amy, Alice, Roisin and Helen's blogs!)

Anyways, want to see my swag??

After one of the most amazing swaps I have ever seen (I may have brought a few too many patterns with me...!) I walked away with three vintage knitting patterns, two gorgeous dress patterns, a whole load of yarn and, can you believe it, my very own sleeve board complete with cover! How lucky am I? I can't believe that I got all these lovelies for FREE. Amazing :)


When it came to the actual purchasing of fabrics at the amazing Rag Market I was fairly reserved. After all six metres of wool isn't too much, is it?! I spotted the most beautiful tan italian wool on one of the stalls of the outdoor market almost as soon as we started to browse and I fell in love. When I learnt that it was £5 per metre I was sold. It's so soft I have been obsessively stroking it ever since I got it home! My second and final purchase of the day was from the indoor market. Helen and I spotted this beautiful claret wool at the same time and we both came away with 3 metres of it. Perhaps at the next blogger meet up we'll be sporting matching outfits? :)

General wooly goodness!

And I've already picked out a couple of patterns from my stash for these wools, have a look at what I'm planning...

A New Look style suit in Italian Wool, happy days!

Gertie's Wiggle Dress would look so gorgeous in this colour!

It was a wonderful day and I'm very much looking forward to (and hoping for!) the next one! Thanks girls for making the day so great, it was so lovely to meet every one of you :)

Katie xxx

P.S. The beady eyed among you may have noticed that I might be wearing a plaid cape in the above picture... Yes, it's finished! I will be getting the last few construction posts up over the next couple of days before it's big blog reveal, but rest assured it was a great success and was ridiculously comfy to wear!

Friday, 2 November 2012

A Cape Adventure #3 - Pad Stitching the Collar


Pad stitching is one of my favourite parts of hand-tailoring! I find all the little hand stitches very relaxing and I love to see the shape of the collar change as I work in it. For those of you unfamiliar to pad stitching it's basically a way to help your collar keep it's shape beautifully through lots of tiny hand stitches and steaming. Gertie shows us how to pad stich in this fancy tutorial, check it out, she explains the whole things much better than I ever could!

Here are a few shots of my newly pad stitched under collar, I love it so much, all the stitches make me happy!


And here you can see the teeny tiny stitches on the stand (the area of the collar below the roll line). These too make me happy :)


I am loving all the hand tailoring I have been able to do on this cape so far, and there is more to come! Next time I tackle something I've never tried before: Welt Pockets!

Bye for now!

Katie xxx
Related Posts Plugin for WordPress, Blogger...